In a sense, team collaboration sites are the
centerpiece of SharePoint, because the information that is published or
archived originates from team collaboration sites. Since team
collaboration means many different things to different people,
SharePoint 2010 comes with a wide array of site templates as part of the
base product. In the following section, you will review each of these
site types and learn about when to use each.
It is a generally
accepted best practice to segregate collaboration sites into a dedicated
Web application that is set aside for this purpose. The reasoning
behind this is simple. Collaboration is a highly active content
manipulation activity—the content is not very static. Because the
content is subject to so much change, the latest content must always be
available for users, which requires a Web application that is properly
tuned for threading and caching. Consider the contrast between this
highly dynamic process and publishing and portals, in which the content
is relatively static. In such circumstances, the use of caching and
threading can result in fewer round trips between the Web front-end
server (WFE) and the database server. This is good, because the content
changes infrequently in a publishing or portal site, so you don’t need
or want every request to go all the way back to the database server.
1. Collaboration Site Templates
Collaboration site templates are available under the Collaboration tab when you create a new site collection in SharePoint Central Administration, as shown in Figure 1.
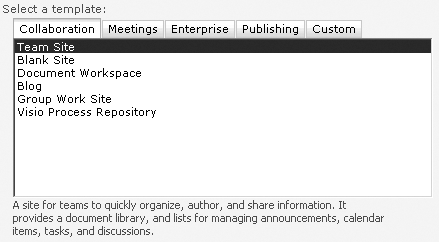
Table 1 provides a brief explanation of each site template that is available in the Create Site Collection interface.
Table 1. Collaboration Site Template Types
| TEMPLATE | USE |
|---|
| Team Site | A
site for teams to quickly organize, author, and share information. This
type of site provides a document library and lists for managing
announcements, calendar items, tasks, and discussions. When used in
conjunction with self-service site creation (SSSC), team sites provide
end users with the ability to create collaboration sites that are
self-organizing with a low transaction cost. |
| Blank Site | A blank site you can customize based on your requirements. |
| Document Workspace | A
site for colleagues to work together on a document. It provides a
document library for storing the primary document and supporting files, a
tasks list for assigning to-do items, and a links list for resources
related to the document. |
| Blog | A site for a person or team to post ideas, observations, and expertise that site visitors can comment on. |
| Group Work Site | This
template provides a groupware solution that enables teams to create,
organize, and share information quickly and easily. It includes Group
Calendar, Circulation, Phone-Call Memo, a document library, and the
other basic lists. |
| Visio Process Repository | A
site for teams to quickly view, share, and store Visio process
diagrams. It provides a versioned document library for storing process
diagrams and lists for managing announcements, tasks, and review
discussions. |
2. Meetings Workspace Site Templates
Meeting
workspace site templates are available under the Meetings tab when you
create a new site collection in SharePoint Central Administration, as
shown in Figure 2.
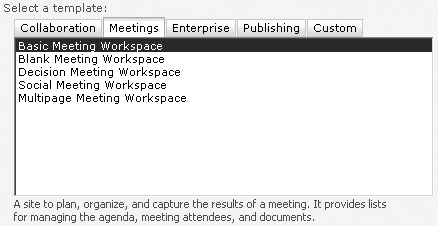
Table 2 provides brief explanation of each site template that is available in the Create Site Collection interface.
Table 2. Meeting Workspace Site Template Types
| TEMPLATE | USE |
|---|
| Basic Meeting Workspace | A
site to plan, organize, and capture the results of a meeting. It
provides lists for managing the agenda, meeting attendees, and
documents. |
| Blank Meeting Workspace | A blank meeting site you can customize based on your requirements. |
| Decision Meeting Workspace | A
site for meetings that track status or make decisions. It provides
lists for creating tasks, storing documents, and recording decisions. |
| Social Meeting Workspace | A
site to plan social occasions. It provides lists for tracking
attendees, providing directions, and storing pictures of the event. |
| Multipage Meeting Workspace | A
site to plan, organize, and capture the results of a meeting. It
provides lists for managing the agenda and meeting attendees in addition
to two blank pages you can customize based on your requirements. |
3. Enabling Collaboration Features
Although the site types described in the prior section are created with some of the Team
Collaboration features already enabled, these features can also be
enabled within any SharePoint 2010 site collection. When activated, they
will create a document library for Shared Documents, as well as
Calendar and Tasks lists for the team. In addition, the collaborative
list templates become available within the Create page, thereby allowing
contributors to create new document libraries, task lists, and contact
lists. These additional list types allow for a team or group to
effectively leverage SharePoint 2010 as a collaboration solution.
Table 3 introduced the Team Collaboration features in detail as they are described within the feature management user interface.
Table 3. Team Collaboration Features
| FEATURE | DESCRIPTION |
|---|
| Team Collaboration Lists | Provides team collaboration capabilities for a site by making standard lists, such as document libraries and issues, available |
| Group Work Lists | Provides calendars with added functionality for team and resource scheduling |
| Offline Synchronization for External Lists | Enables offline synchronization for external lists with Outlook and SharePoint Workspace |
| SharePoint Server Standard Site Collection features | Features such as user profiles and search, included in the SharePoint Server Standard License |
| SharePoint Server Standard Site features | Features such as user profiles and search, included in the SharePoint Server Standard License |
To activate the collaboration features within an existing site collection, follow these steps.
From the top site within the site collection, use the Site Actions menu to select Site Settings.
Within
Site Settings, select Site Collection Features, which can be found
under the Site Collection Administration settings group.
Activate the SharePoint Server Standard Site Collection Features if it is not already activated.
Within Site Settings, select Manage Site Features, which can be found under the Site Actions settings group.
Activate the feature called SharePoint Server Standard Site Features if it is not already activated.
Activate the feature called Team Collaboration Lists if it is not already activated.
Optionally, activate the feature called Group Work Lists if it is not already activated.
Optionally, activate the Feature called Offline Synchronization For External Lists if it is not already activated.
|
Blank
sites are unique—they come without any features and functionality so
you can enable the features you need for your specific requirements.
Blank sites provide basic services from SharePoint Foundation 2010, as
well as some of the collaboration features and capabilities listed in Table 10-3.
However, if you don’t need those features for your custom site
implementation, you can simply deactivate them. Likewise, if you need
some of the features that are not activated by default, simply activate
them as needed.
|
4. Planning for Collaboration
Planning
for collaboration sites involves forethought from an IT administrator’s
perspective. Because collaboration sites are usually managed and
configured by the content owners themselves, it’s sometime helpful to
think of collaboration sites as a service offering. This is in alignment
with the way Microsoft has deployed SharePoint as a service internally.
By thinking in a service-centric way, you can align your SharePoint
deployment with the diverse business needs of your users as well as take
into account the infrastructure, support, performance, and capacity
considerations. This section discusses the creation of a dedicated Web
application for collaboration sites, the use of managed paths for
further segregating and simplifying URLs for your users, and the process
planning options for provisioning.
4.1. Web Applications
It is often a good idea to
have a dedicated Web application or Web applications in the farm
specifically for provisioning collaboration sites. This makes
performance tuning and capacity planning much easier, because all of the
site collections will be performing similar activities and the strain
on the underlying software architecture is somewhat predictable.
Although it’s logical to assume that users will create workspace sites
with collaboration sites, it’s also possible that users will want to
create workspaces as individual site collections as well. The guidance
offered to users is to consider the purpose of a workspace before
creating the workspace within an existing collaboration site. Does it
really belong there? Is it related in any way to the purpose of the team
or the common objective being pursued within the collaboration site
collection? If not, it probably belongs in its own site collection. This
ensures that the content life cycle of the workspace can be handled
separately from that of the collaboration site, thereby allowing the
workspace site to be deleted, either manually or automatically, far
sooner than the collaboration site.
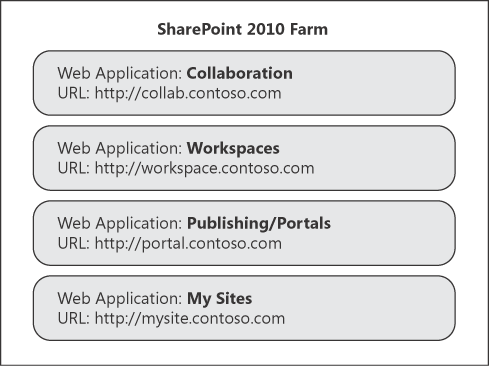
Consider creating two Web
applications for collaboration: one for non-workspace collaboration site
collections, and one for workspace site collections. This allows even
further separation of these two similar but different site collection
types. Further separating these site types allows you to use different
default quota templates and automated deletion policies.
Figure 3
provides an example Web application allocation for a typical SharePoint
2010 farm, illustrating how separate Web applications for collaboration
sites and workspace sites are created, and how those two Web
applications fit into the larger picture of the entire implementation.
4.2. Managed Paths
Managed paths are a
mechanism that allow for the definition of additional URL paths below
Web applications. There are many reasons people decide to use additional
managed paths. For example, although the default managed paths will
work for most implementations, some people may find it useful to create
additional paths for specific types of sites or organizational
divisions. You may also want to be able to add a filter to your firewall
or router to constrain a specific namespace to internal access only.
If you need to group sites
by specific site type, you could use a managed path. An example of this
would involve providing team collaboration sites for varying types of
teams within your organization. In order to make the URL paths easier
for users to understand, as well as to reduce the likelihood that
multiple teams will request the same URL, you decide to create a managed
path for departmental collaboration sites as well as a managed path for
project sites. The managed paths would appear as
Some key concepts regarding Managed Paths include the following.
Managed paths allow SharePoint to determine what portion of a given URL corresponds to the site collection URL.
Managed paths can be defined per Web application.
Managed paths can be explicit or wildcard.
Note:
BEST PRACTICES Limit managed paths to fewer than 20 per Web application for simplicity. If you need more than 20, you should consider adding an additional Web application.
To create additional managed paths for your collaboration Web application, perform the following steps.
Open a browser and go to the SharePoint Central Administration website.
Under Application Management, click Manage Web Applications.
Select the Web application for which you would like to add the new managed path.
After
you select a Web application, click the Managed Paths menu item from
the Manage group of the Web Applications Ribbon at the top of the
screen, which will display a dialog box similar to the one shown in Figure 4.

In
the Add a New Path section of the dialog box, enter the Path URL you
want you add (e.g., dept) and click the Check URL link to verify that
the path does not already exist or is not already taken by a site
collection.
Select the type of path you want to add.
Click Add Path to add the managed path, after which the path will appear in the provided list.
When you have finished, click OK to return to the Manage Web Applications page.
4.3. Provisioning
Provisioning is a very important consideration when it comes to planning
for the deployment of collaboration sites. You need to consider how
many site collections you might expect in specific time frames to
determine which provisioning option suits your requirements best. There
are three primary options for the provisioning of collaboration sites.
Self-service site creation
Request-based site creation
Custom site provisioning application
4.3.1. Self-Service Site Creation
Self-service site
creation is a built-in capability provided by SharePoint 2010. When
enabled, users who have the Use Self-Service Site Creation permission
are able to create sites in defined URL namespaces. This allows
designated users to create site collections as needed but offers very
little in the way of integrated guidance for when and how they should
use specific types of sites and for what purpose. For this reason, you
should be sure that associated user training activities coincide with
enabling self-service site creation to ensure that users who have this
capability are provisioning site collections in accordance with the way
your organization has decided to leverage SharePoint.
To enable self-service site creation, perform the following steps.
Open a browser and go to the SharePoint Central Administration website.
Under Application Management, click Manage Web Applications.
Select the Web application for which you would like to enable self-service site creation.
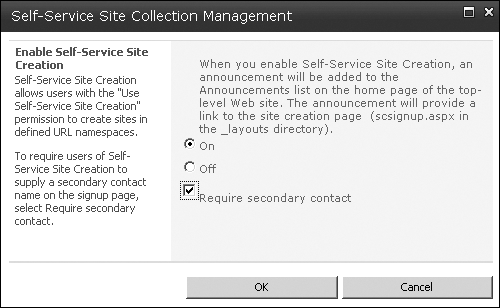
After
you select a Web application, click the Self-Service Site Creation menu
item from the Security group of the Web Applications Ribbon at the top
of the screen, which will display a dialog box similar to the one shown
in Figure 5.
Select the On option to enable self-service site creation.
Optionally, select the Require Secondary Contact check box.
When you have enabled
self-service site creation, an announcement will be added to the
Announcements list on the home page of the top-level site within the Web
application; it will provide a link to the site creation page, which
can be found at _layouts/scsignup.aspx.
4.3.2. Request-based site creation
Of course, if you want
ultimate control over the site collections that are created, you can
devise a request-based site creation process.
Note:
The request-based site creation process is implemented completely outside of SharePoint.
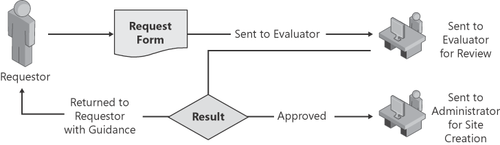
Usually, request-based
site creation entails establishing a well-documented process and
evaluation criteria for the appropriateness of the request. When the
request has been reviewed and approved, it can be sent to a designated
administrator for fulfillment. Figure 10-6 illustrates this process.
There are advantages and disadvantages to this type of provisioning. The advantages include
Complete control over which sites are created
The ability to guide requestors appropriately based on their needs
The ability to control site sprawl
Some disadvantages of this approach are
Potential overburdening of the request evaluator as adoption increases
Potential overburdening of IT support
Possibly limiting technology adoption
Remember, SharePoint is a
user-centric technology, and although the request-based site creation
approach has its administrative merits, you should implement it only
after due consideration of the advantages and disadvantages of the
technology.
5. Integration with SharePoint Workspace 2010
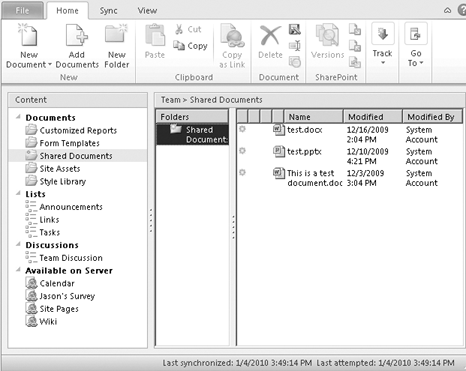
Think of SharePoint
Workspace 2010 as the Microsoft Office client for team collaboration in
SharePoint 2010. Although Office Outlook continues to offer many
enhanced features for synchronizing data and working offline with
SharePoint list information and feeds, Microsoft SharePoint Workspace
2010 provides a complete rich experience for both online and offline
use. With SharePoint Workspace 2010, you can have full fidelity access
to a team collaboration site, including all the document libraries,
lists, discussions, and documents. All of the information is presented
in feed form, which allows you to view information that has changed
since the last time you reviewed it. The best part is that SharePoint
Workspace 2010 is included with Microsoft Office 2010 Professional Plus,
making it a likely desktop application in the enterprise space and
highly accessible to your users. Figure 7 shows SharePoint Workspace 2010 in action.
After you have configured a workspace connection, as shown in Figure 7, you will be alerted when new unread data appears in that workspace. A sample alert is shown in Figure 8.
